Archive for November 2nd, 2011
Photoshop and Perspective
Posted by J. Miller in Digital Art, Hand rendered digital art. on November 2, 2011
Every now and then, a question plagues my mind over why something hasn’t been explained before, or if it has, why nobody seems to have thought to share it with others that it could be found with a little Google-fu.
One of those that keeps coming back to me is why hasn’t anyone put out a means of quickly finding perspective planes and features using Photoshop? Sure there are bits and pieces of information about using perspective in Photoshop as it pertains to painting on perspective planes inside existing photos, like picking off data points for the side of a barn and then using the brush tool to draw as if you’re drawing on the wall itself, but this isn’t so helpful when you’re starting from scratch.
Now if all you’re after is a quick 2-pt perspective for a single object with one orientation, then you can rough in perspective lines fairly well just by picking out two vanishing points at a reasonable distance and drawing a bunch of lines emanating from them like this:
…and putting it on its own layer to keep it separate from the drawing proper. I picked that one up from Michael Matessi’s Drawing Force website, but it’s a fairly standard trick, and a good one.
But say you’re constructing a scene where not everything is oriented along the same perspective lines. Reality is more varied than that and if you’re creating a scene that incorporates more than one set of VP’s (vanishing points) for different objects/characters, then I have figured out relatively quick means of establishing some guides to quickly get you on your way.
Open up Photoshop and begin by making sure the rulers and snaps are turned on, then drag a guide down from the top ruler and use this as your horizon line. Place it wherever your scene dictates it should be.
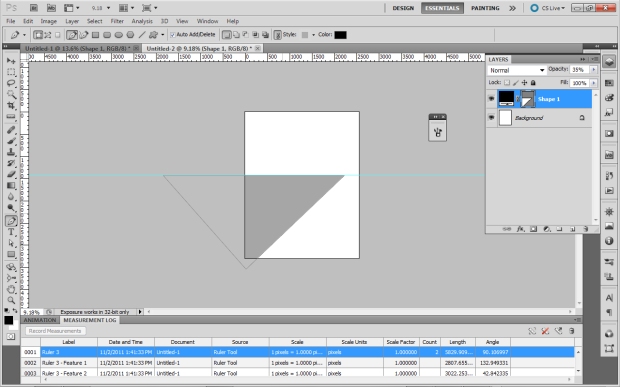
Next, use the pen tool in its ‘shape layers’ mode to draw a triangle with two of its points located along the horizon/guide and the third located below (or above depending on the need) in such a way that the angle it forms is eyeballed as close to 90 degrees as you can, like this:
Note that it’s important to keep one VP inside the print image area at this point because of a Photoshop quirk I’ll get into later.
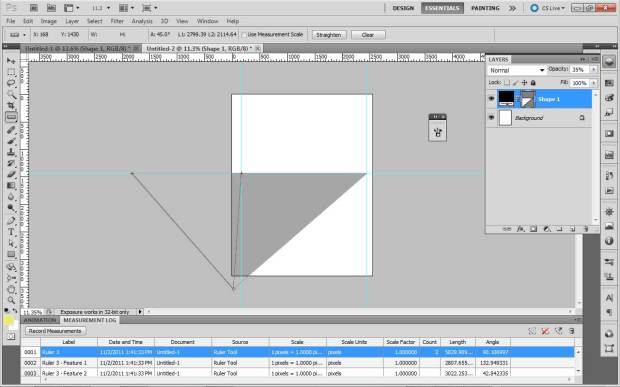
Next, open up Photoshop’s measurement tool and draw a measurement line from the left VP down to the bottom vertex of the triangle. Alt-click over the same vertex and extend a second measurement line back up to the horizon line near where the right VP is. It should snap to the horizon. Adjust the position of the measurement endpoint left or right along the horizon until the angle it reads on the options bar reads 90 degrees and then snap a new guide to this location as seen here:
You can’t skip this step, because the moment you switch to the Direct Selection tool (next step), the measurement tool lines disappear.
Now you can switch to the Direct Selection tool, pick the triangle shape itself, and adjust the right VP to the intersection of the horizon guide and the vertical guide you just created. Your triangle has now been ‘calibrated’.
At this point, you may want to establish the Diagonal Vanishing point (as it’s very useful to have as you already know if you’ve worked in perspective drawing for any length of time) by bisecting the bottom angle of the triangle and finding where that meets the horizon line. You can do this easily now by repeating the process above with the measuring tool but using 45 degrees as your target angle to hit. Like this:

You can mark any of these points on their own layer now and label them if need be. I used circle shape layers to mark these points, but you’re free to use a different marking method as you like it. I would however, use layer-linking to ensure that all the work you just did on creating that triangle shape stays oriented with the labeling layer(s). Just makes sense. Also good for keeping all of this organized is creating a folder to store the layers in, which keeps clutter and layer-searching to a minimum. This is how my screen looks now:
Now, what’s really great about this setup is that you can scale all of this prep work, move it to new locations and pretty much duplicate and dissect individual elements to create new perspective guidelines. However, I would hold off on moving and scaling all of the components together until you’re finished establishing all the different perspective sets you need. The objects scale, but the guides you’ve been using do not. Keep this in mind.
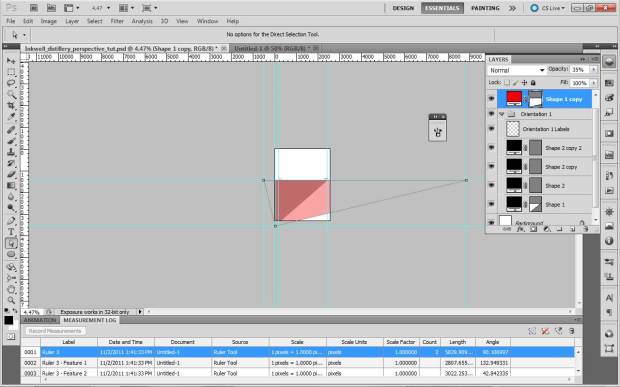
If for example, you wish to have a different set of points set up for an object oriented differently, copy the triangle you created earlier, and change its color to distinguish it from the first. Next, use the transform path tool to rotate the new triangle to the orientation you want to draw the second object in, but just remember to move the center of the transformation to the triangle’s base. This keeps all the elements in the final piece looking like they belong in the same space. If it helps, you can pull a new set of guides off of the rulers to maintain the same bottom vertex for the triangle as seen here:

Notice that by rotating the triangle like this, one leg ends up crossing the horizon line while the other one drops below it. Using the Direct Selection tool, select the two endpoints of this line and scale them similarly to how we rotated it above, by moving the center of scaling to the bottom vertex. Make sure you keep scaling it until it too crosses the horizon line. Remember, we’re only scaling the one leg and it should scale only along it’s length, like this:
Create a new pair of vertical guides that as closely as possible locates the intersection between the legs of the triangle and the horizon line. Move the two upper vertices of the triangle to these intersection points and your new perspective orientation has been established, seen here along with the first orientation in grey:
At some point along the way, if it makes it easier, you can expand the canvas size so that all of your construction triangles fall within the canvas boundaries. This makes it easier to use the measurement tool, as it sometimes has issues measuring angles for points outside of the canvas.
Now you can find the new Diagonal Vanishing Point (DVP) for the new triangle using the same method used above.
Fully labeled and organized, you should end up with something looking like this:

All of the layers are linked, to keep them consistent. Now using the line tool, and snapping to the guide intersections, I can now freehand a grid for both orientations on respective layers thus:

This is still somewhat confusing as it’s currently set up, so let’s create a new group to hold both sets of perspective orientations, and create a vector mask for that group in the proportions of our final page output. In this case, 8.5×11. I’ve cropped the overall image for clarity but because of the abundant usage of vectors, there is minimal information lost. Notice how the vector mask allows you to search for optimal framing. It’s never a bad idea to experiment with different framing schemes even if you started out with something specific in mind earlier. You can always find something better and unexpected. Here’s what our final setup looks like:
Now we can finally start drawing with our new references, turning the relevant layers on and off to suit the object we’re drawing at any given time, and we can also adjust the opacity so the visual stimulus doesn’t become overwhelming.
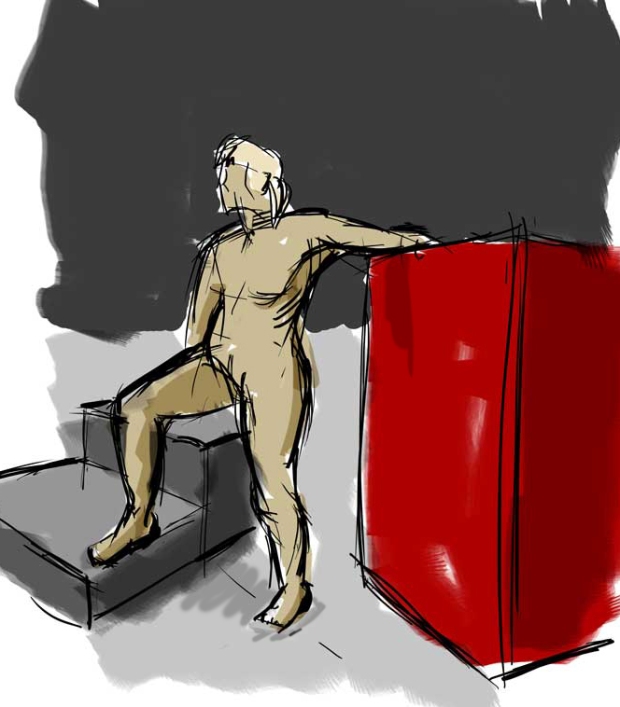
Here’s a quick doodle completed with the aid of the setup. The red box was done with the second perspective points and the figure and steps done with the first set.


